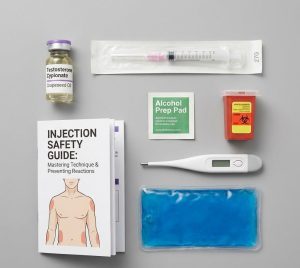
The essential toolkit for safe self-administration, emphasizing hygiene, proper hardware, and reaction monitoring.
For the millions of individuals who utilize self-administered injectables—whether for Testosterone Replacement Therapy (TRT), peptide protocols like BPC-157, or performance enhancement—the injection itself is often the easy part. The anxiety usually stems from the aftermath: the crippling soreness that lasts for days, the red and itchy welts, the mysterious lumps, or the terrifying possibility of an infection.
While the internet is full of “bro-science” blaming “bad gear” or “high solvents” for every reaction, the reality is that the vast majority of injection issues are mechanical. They are caused by human error, poor technique, or a misunderstanding of how the body interacts with foreign substances.
This guide is designed to move beyond the basics of “stick and push.” It explores the physiology of intramuscular (IM) and subcutaneous (SubQ) administration, providing a detailed roadmap to minimizing trauma, preventing inflammation, and distinguishing between a harmless depot and a medical emergency.
The essential toolkit for safe self-administration, emphasizing hygiene, proper hardware, and reaction monitoring.
1. Understanding the Enemy: Types of Reactions
Before you can prevent a reaction, you must identify what you are trying to avoid. Reactions generally fall into a hierarchy of severity.
Post-Injection Pain (PIP): This is the most common issue. It manifests as a dull, deep ache in the muscle, often starting 12 to 24 hours after the injection. It can feel like a severe bruise or an intense workout soreness (DOMS).
Cause: Mechanical trauma from the needle, high concentrations of solvents (Benzyl Alcohol), or the volume of fluid physically stretching the muscle fibers.
Sterile Abscess (The “Lump”): A hard, often painless or mildly tender nodule under the skin.
Cause: This is usually an “oil depot.” The oil has not absorbed quickly enough, so the body walls it off with scar tissue to isolate it. It is not infected, but it can take weeks to dissipate.
Subcutaneous Leak (The “Red Patch”): A red, itchy, warm patch of skin, often accompanied by a lump.
Cause: Oil intended for the muscle leaked back up the needle track and settled in the subcutaneous fat layer. Oils often irritate fat tissue, causing a localized inflammatory response that looks like an infection but isn’t.
Infection (Cellulitis/Septic Abscess): The true danger. Symptoms include spreading redness (streaking), skin that is hot to the touch, fever, and throbbing pain.
Cause: Bacteria introduced via a dirty needle or unsterile skin.
2. Chemistry Control: Solvents and Carriers
Many users endure unnecessary pain because they do not understand the chemistry of what they are injecting. The liquid in the vial is a delicate balance of hormone, carrier oil, and solvents.
The Solvent Trap (BA and BB):
Benzyl Alcohol (BA): Used to keep the solution sterile (bacteriostatic). Standard gear contains 1% to 2% BA. If a UGL (Underground Lab) brews with 5% BA to ensure sterility in dirty conditions, it will burn significantly upon injection.
Benzyl Benzoate (BB): Used as a co-solvent to dissolve the hormone powder. High-concentration gear (e.g., “Test 400” or “Sustanon 350”) requires massive amounts of BB to keep the hormone from crashing out of solution. This is the #1 cause of PIP.
The Fix: Avoid “super-dosed” gear. A standard Testosterone Enanthate at 250mg/mL is painless. At 400mg/mL, it is liquid fire. Stick to standard concentrations.
The Carrier Oil Viscosity: The thickness of the oil dictates how much force you need to use.
MCT Oil / Miglyol: The “gold standard” for thinness. It flows like water, requires almost no pressure, and disperses instantly. It rarely causes PIP.
Grapeseed/Cottonseed Oil: The pharmaceutical standard. Slightly thicker, but generally well-tolerated.
Castor Oil: Extremely thick. Often used for slow esters. It sits in the muscle like a rock and can cause significant soreness.
3. The Hardware: Stop Harpooning Yourself
One of the biggest mistakes in self-administration is using outdated medical standards. Doctors often use 21g or 23g needles because they are fast. For a daily or weekly user, these are unnecessary harpoons.
The Physics of Trauma: A 21g needle creates a significant channel in the muscle tissue. This leads to:
More Bleeding: You are more likely to nick a capillary.
Scar Tissue: Repeated trauma leads to fibrosis, making the muscle harder to inject over time.
Leakage: A large hole allows oil to flow back out easily.
The Optimal Setup:
For Oils (IM): Use a 25g to 27g needle (1 inch or 1.5 inch depending on body fat). A 27g needle is virtually painless and causes minimal trauma. It takes longer to push the oil, but that patience pays off in reduced inflammation.
For Peptides (SubQ): Use a 29g to 31g insulin syringe. Since peptides are water-based, they flow effortlessly through these tiny needles.
The “Draw” Needle: Always draw with a large gauge (18g-21g) and inject with a fresh, smaller gauge. Puncturing the rubber stopper dulls the needle tip microscopically. Injecting with a dulled needle is like pushing a jagged saw blade through your skin.
4. Pre-Flight Protocol: Temperature and Hygiene
You can reduce PIP by 50% simply by manipulating the temperature of the oil.
The Heat Hack: Injecting room-temperature (20°C) oil into a 37°C body causes “thermal shock.” The muscle contracts around the cold fluid, and the thick oil requires force to push, leading to hand tremors and tissue tearing.
Protocol: Run the barrel of the loaded syringe (capped) under hot tap water for 60 seconds, or use a candle warmer/heating pad for the vial.
Result: The oil becomes as thin as water. It flows through a 27g needle with zero resistance, enters the muscle at body temperature, and disperses immediately.
Hygiene (The Non-Negotiables):
Alcohol Swabs: Use separate swabs for the vial stopper and your skin.
The “Dry” Rule: After swabbing your skin, wait 30 seconds. Let the alcohol evaporate. If you inject while the skin is wet, the needle drags alcohol into the subcutaneous tissue and muscle. Alcohol is a solvent; injecting it causes an immediate, sharp stinging sensation (the “alcohol burn”).
5. The Mechanics of the Shot
This is where the rubber meets the road. Even with perfect gear, bad mechanics will cause a reaction.
A. Stabilization (The Anchor) The needle must remain absolutely still once inside the muscle. If your hand shakes, the needle tip vibrates like a jackhammer, slicing micro-fibers inside the tissue.
Technique: Use the “Tripod” method. Lean your body against a wall or table. Rest the heel of your injecting hand against your own body to stabilize the syringe. Never “free hand” a shot in mid-air.
B. The Z-Track Method (Crucial for IM) To prevent the “subcutaneous leak” (red, itchy lumps), use the Z-Track technique.
Pull the skin and fat layer 1 inch to the side with your non-injecting hand.
Insert the needle and inject.
Wait 10 seconds.
Withdraw the needle simultaneously as you release the skin.
Why: This aligns the layers of tissue during the shot but misaligns them after. It creates a “zigzag” path that seals the oil deep in the muscle, preventing it from leaking back up to the skin.
6. Site Selection: Rotating the Battlefield
Injecting the same spot repeatedly leads to scar tissue buildup and sterile abscesses. You must rotate.
The Ventroglute (The King): The traditional “butt shot” (Dorsoglute) is actually risky due to the sciatic nerve and deep fat layers. The Ventroglute (side of the hip) is superior.
Pros: Thin skin, massive muscle density, almost no nerves or major blood vessels.
Cons: Can be awkward to find initially.
The Deltoid: Great for small volumes (under 1mL).
Warning: The delt is a small muscle. Injecting 3mL here will cause pain simply due to volume overload (hydrostatic pressure).
The Quadriceps (The Danger Zone): While easy to access, the quads are notorious for PIP. They are dense with nerves and veins.
Guideline: If you must inject quads, use the Vastus Lateralis (outer sweep). Never inject the “tear drop” or the top/inner thigh.
7. Post-Injection Care
What you do immediately after the needle leaves the skin matters.
To Massage or Not?
For Oils (IM): Yes. Gently massaging the area for 1-2 minutes helps disperse the depot, increasing surface area for absorption. A heating pad applied 10 minutes post-injection also increases blood flow and absorption speed.
For Peptides (SubQ): No. Peptides are fragile chains. Massaging can bruise the delicate fat tissue or alter the absorption speed. Inject and leave it alone.
Dealing with “Virgin Muscle” PIP: If you are injecting a muscle for the first time, it will hurt. The fascia (the sheath around the muscle) has to stretch to accommodate the fluid. This “virgin muscle” pain is unavoidable but only happens the first 1-2 times. Do not mistake this for an infection.
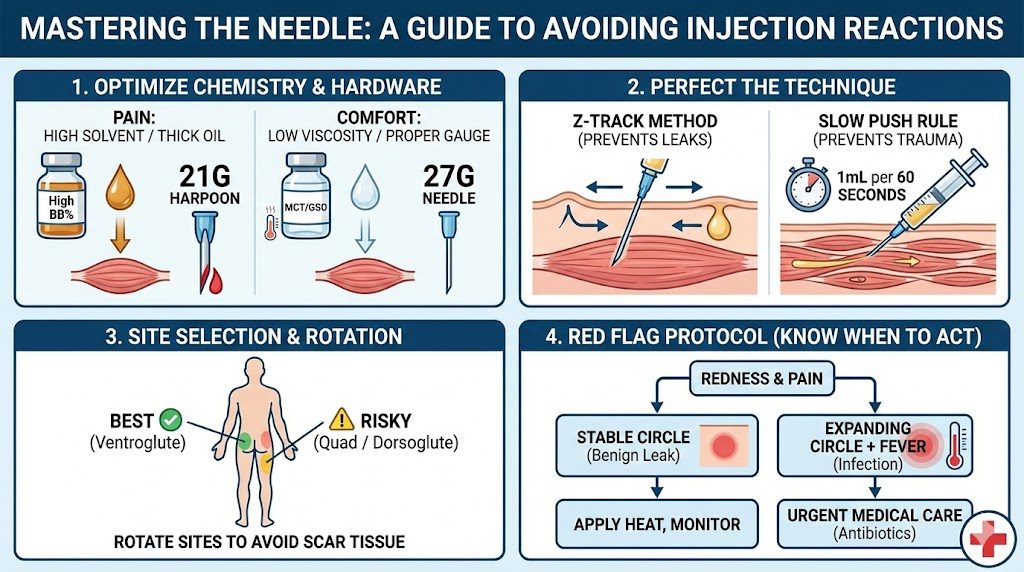
A step-by-step visual guide to minimizing injection risks, from choosing the right needle gauge to identifying signs of infection.
8. Troubleshooting: When to Worry
Most reactions are benign, but you need a rubric for escalation.
The “Test Flu”: A systemic reaction where you feel achy, feverish, and lethargic for 24 hours after a shot.
Verdict: Harmless. It is your immune system reacting to the solvents or the carrier oil. It usually resolves on its own as your body adapts.
The “Red Line” Test: If you have a red, hot, painful area:
Take a sharpie and draw a circle around the border of the redness.
Wait 6-12 hours.
If it stays within the line: It is local irritation/leak. Apply heat and rest.
If it expands past the line: The infection is spreading (Cellulitis). If accompanied by fever, seek medical attention immediately.
Conclusion
Avoiding injection reactions is a discipline. It requires treating the procedure not as a quick chore, but as a minor medical intervention. By upgrading your hardware to smaller gauges, mastering the Z-track technique, warming your oils, and respecting the chemistry of the vial, you can virtually eliminate the “crippling PIP” that plagues so many users. Respect the needle, and your body will thank you.